Mysterious, Kinetic, Noisy, Do-It-Yourself Science Projects that Entice Scientific Investigation
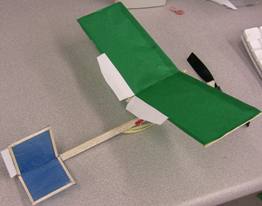
Rubber Band Powered Airplanes that Fly Great
All my 6th grade students-- over 250 of them every year when I was teaching - made this project from scratch. Thin strips of balsa wood were challenging to work with, but when the kids put their finished creations to flight there are no words to describe the joy
Seeing one of these planes soar gracefully overhead re-defines your perception of the three-dimentional space above. It even re-defines us: we are creatures living at the bottom of an ocean of air. All my 6th grade students-- over 250 of them every year when I was teaching-- made this project from scratch. Thin strips of balsa wood were challenging to work with, but when the kids put their finished creations to flight there are no words to describe the joy.
Although this design worked well for us, I owe it to you to say: check out this other site, by Jan Nosul in the Netherlands, for a design that's make from scratch out of common materials. If you do not have access to balsa wood and propellers, these are the best instructions for getting started, I think. I asked Jan to tell me more about himself and how he came to model airplanes. His reply was so interesting that I copied and pasted it here.
I am experimented with a crude kind of "washout"--having less wing tilt at the wing-tips than at the root--by gluing paper that is curved down near the middle of the wing. Washout can help prevent a problem called "tip stall" which causes the plane to spiral dive.
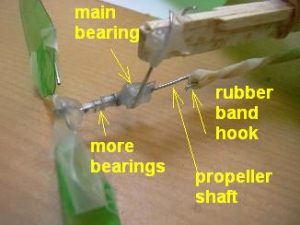
The latest development to this project is making propellers from ordinary paper clips and the plastic from 2-liter bottles.
More About Jan Nosul
I asked Jan to tell me more about himself and how he got involved with indoor models. His reply was so interesting and funny that I am just copying and pasting from the e-mail:
Hey Slater
I am very happy to see, that this project can have a chance to help out kids around to start with this beautifull hobby. With your support this seems to be way more possible. I guess would be good to update the tutorial a bit with more explanations here and there about details, I will try to make it done asap. Also I will try to include trimming tutorial and basic aerodynamics behind it in an easiest way possible. A lot more can be done to explain the topic, actually every part of such an airplane can have a separate tutorial, so let us see what the feedback will be 🙂
Some info about myself. My name is Jan Nosul, I am polish, but I live permanently in the Netherlands. I am 35 years old, always kinda technical, I work in IT. Came to NL 6 years ago on holiday, and actually I stayed longer 😉
I guess the virus of such a flying aircrafts was in my veins all my life, since I think I got it with my father's blood 🙂 As a kid he was busy with other kids building big wooden outdoor gliders, and some of them he later on built with me and it was a lot of fun. A lot of flying toys were at that time available and popular in Poland, also people did not have a lot of money, so this was way more common to build toys by kids themselves.
Some time later I was reading about rubber band airplanes in few books and magazines, also very easy versions I tried to build as a kid, but without too much success in flying. Today I know, they were way too heavy. But they flew for short time and this was magic.
Last holidays we were camping with my girlfriend in a nice place and I made paper glider for fun. That was way more fun that we expected, both we played with it for quite some time:) I think that the flying spirit in me was triggered back to life at that time:) After coming back home I realized that this could be a nice new hobby for me, cause my long lasting hobby programming, actually is not a hobby anymore, since I do it professionaly for years, I needed new one!:)
So I started playing, I knew it would be rubber band powered. I came across ornithopters. And it was way more difficult to get some flying time, than I expected. I made a lot of this models, before got decent climbing flight. And I read on Nathan Chronisters page, that you actually can not build a good flying ornithopter from common materials, or its very difficult. I took it as a challenge;)
I made bamboo versions in the end, which flew ok. Its white version in this video:
I plan to merge this two channels into one btw.
The problem in the Netherlands is that its super difficult to fly outdoor in my opinion. Everywhere you have trees and water plus a lot of wind, so I lost a lot of models. That was not fun, so I had to go indoor as a natural process. Also I like to make sure, that the model I build flies, because of its properly made, powered and trimmed, and not because its too much wind 😀 So indoor and if indoor, than propellers - not ornithopters. And I carried a challenge of common materials built to this task as well. I thought propeller based airplanes will be way more easy than ornithopters and that was not truth 🙂 A lot of work has been applied to that, and I started adopting professional indoor practices like rolling tissue tubes, making pigtail bearings, bending wet wood and drying it, etc. So you learn a lot doing that, and that can be super beneficial for those all kids I guess. As Mike Parlang, US champion in the indoor flying says: There are many opportunities to advance your knowledge of what it takes to make one fly good (or many opportunities to find out what doesn't). Usually its the second one 😀 Lets hope those kids will be stubborn enough 🙂
Jan
I'd like to know how this project goes for you. I'm happy to answer questions about it. Feedback from you is an important way for me to know what works and what needs clarification.