What you need :
- Four 2-liter soda bottles (2 of them un-crushed)
Try to get two bottles that have not been really crushed, because the dents that remain can interfere with the spinning water. - A non-stick pan
- Scissors
- A drill with a ½” bit
- Water to cool welded caps
- A label from a bottle for making some confetti
- Cold water, or refrigeration or ice or snow or cold weather to make it cold.
I know it seems a bit strange to be concerned about air and water temperature as we seal the two bottles together. The reason behind it is quite interesting. I go into it more in the Activities and Explanations page.
For building this project, you should know this much: It is important that the air and water in the bottles be cold when they are being sealed. As the air warms up, it will expand a little. Because it's trapped inside, the air pressure inside the bottles becomes a little higher than the air pressure outside. That's good, because it keeps the bottles firm, just like the higher air pressure in a bicycle tire keeps the tire from going flat.
Without the higher pressure inside, the bottles will dent a little. Because they are no longer perfectly round, it's harder to make a good vortex. Fortunately, this is easy to prevent by keeping things cool when sealing the bottles.
Step 1. Weld Bottle Caps Together.
Here is a video of how to weld two bottle caps together.
If YouTube is blocked at your school, try this SchoolTube link of the same video.
Step 2. Prepare the bottles for sealing.
These sub-steps don't have to be done in any particular order:
- Rinse out bottles.
- Peel off labels. Save a colorful piece for the next part.
- Cut some confetti from the plastic labels you just peeled off.
They become tracers in the vortex (they remind me of the house spinning around in the Wizard of Oz). No piece should be larger than the finger nail on your pinky. Put the pieces into one of the bottles - Fill one bottle about 2/3 full of the coldest water you can get. For example, if there is a drinking fountain with chilled water, it would be worth it to catch it in a cup and pour it into the bottle. Alternately, you could but half a handful of crushed ice or snow in both bottles, or you could put the bottles in the refrigerator or outside (if it's cold) for half an hour.
- If the kids making the vortex are very young (kindergarten or first grade), only fill the bottle half full. It will be easier to carry and easier to start the vortex.
Step 3. Just before you seal.
Just before joining the bottles, turn them upside down so the empty bottle fills (a few drops of water might leak out). This will cool the air inside. The top bottle will probably dent in a little, which means the air in the system is contracting. Unscrew the bottles apart for an instant to let more air in, so the bottle is not dented anymore. Do this just before screwing tight so the air doesn't have a chance to warm up much.
Step 4. Seal the bottle tightly.
Step 5. Use it!
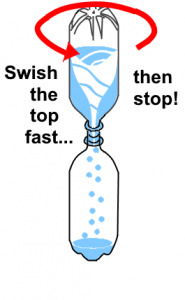 Turn the bottles over. Grab the very top and swish it in a circular motion two or three times, then stop suddenly. This will give the water enough circular momentum to create the vortex.
If the bottle dents, don't worry. It will fill out in a hour or so, as the water warms--if you sealed it well. Until then, at the same time you swishing the top end in a circle to get the water moving, squeeze the the bottom bottle. When the dent is on the bottom, it doesn't interfere with the vortex.